Expo Design Pacific Casual Gazebo Replacement Canopy - 350
-
Details
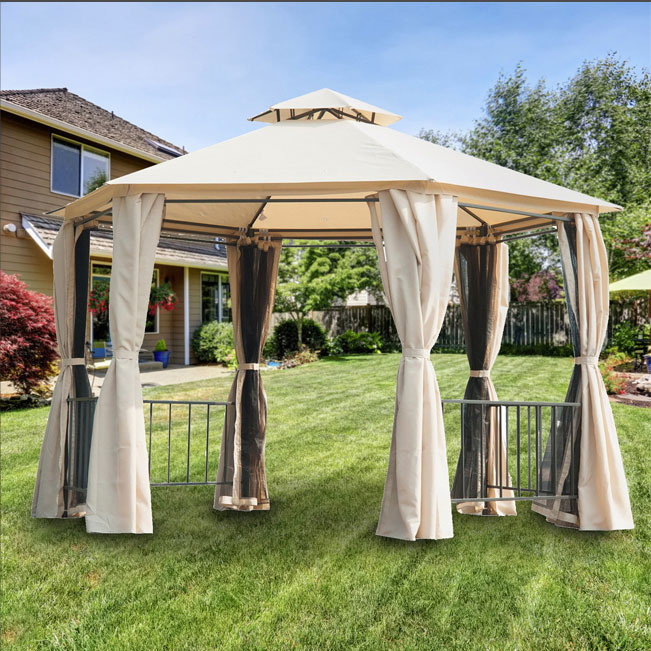
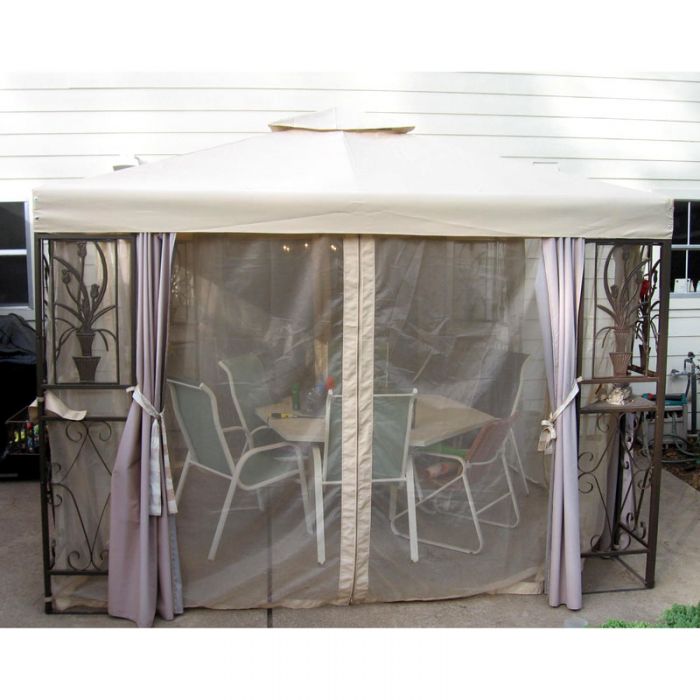
The original canopy had striped sides. Our canopy is a solid beige color (no striped sides).
REPLACEMENT CANOPY FOR
EXPO DESIGN 10' X 10' PACIFIC CASUAL GAZEBO
OEM Gazebo Specifications Gazebo Name
10' x 10' Pacific Casual Gazebo Manufacturer Pacific Casual Manufacturer's Model Number 5G1010WR03C-MQ Retailer/Store SKU Expo Design Center Approximate Frame Size 10' x 10' Roof Type Two-Tiered Overhang Style Classic overhang Signature Indicators of Gazebo - Original canopy had striped valence
- Planter hooks on the corners of frame
- Potted plant motif design on corner panels
- Plant shelves
Garden Winds Replacement Canopy Specifications Fabric 350 Denier Polyester Fabric Canopy Color Beige Whisper (different from original) Attachment Type Velcro straps Fire Resistance CPAI-84 US Standard Sun Treated for protection against UV Moisture Water Resistant Box Content Replacement canopy Additional Info The hooks are not included with the mosquito netting set Country of Origin China -
More Information
More Information Model LCM566B-1 Fabric Grade Standard 350 Color Beige Whisper Manufacturer/Brand Pacific Casual Stores Expo Design Center Size 10 x 10 Shape Square Roof Type Double Tiered Overhang Style Classic Overhang ERP Product ID 1003839 -
Warranty
Garden Winds One Year Limited Performance Warranty
SHOP WITH CONFIDENCE! Garden Winds stands by its canopies and we want you to be happy with your purchase. If, within 6 months of purchase, you experience damage to the canopy* due to a manufacturer defect**, we will send you a ONE-TIME replacement. If you experience damage within 6 to 12 months, a 50% credit will be applied toward the purchase of a NEW canopy (must be the same model). Just send a photo of the damaged canopy along with a full frame photo of your structure. It’s that Easy!
Time from Date of Purchase Warranty Offer Within 6 months One-time replacement canopy Within 6 to 12 months 50% credit towards purchase of new canopy (same model) Please note: Acceptance of the one-time replacement canopy or discounted canopy completes your warranty. The one-time replacement canopy or discounted canopy will not come with a warranty.
*Your canopy is guaranteed to fit provided your original model number from your gazebo matches what is listed on our website. Our universal canopies are not guaranteed to be an exact fit to your gazebo.
** Manufacturer's defects includes, but are not limited to:
- Stitching coming undone
- Elastic coming undone
- Missing canopy hooks
- Velcro straps tearing away from canopy fabric
- Grommet rings popping off or are bent
- Ripped netting, etc.
- Damage upon receipt
The Garden Winds Limited One Year Performance Warranty DOES NOT cover:
- Natural occurrences or weather conditions, such as:
- Blizzards
- Hurricanes
- Snowstorms
- Tornadoes
- Hailstorms
- Heavy winds
- Heavy rains
- Falling tree branches or limbs
- Damage caused by persons or animals.
- Modifications to the fabric itself, i.e. addition of grommet holes or Velcro straps, sewing on decorations, silk screening, etc.
- Universal Replacement Canopies
Because the canopy is made from an outdoor fabric, it will experience deterioration if not cared for properly. Also, varying regions experience different climate conditions that may contribute to a shorter lifespan of the replacement canopy.
If you will experience severe weather, we strongly suggest that you remove the canopy from the frame and store in a cool, dry place until you are ready to enjoy it again. This will help avoid rips and tears, as well as sagging of the canopy due to rain and snow. Leaving the canopy on the frame during heavy rain or snow may cause the gazebo frame to collapse.
-
Shipping & Returns
Shipping
- Ground shipping for all replacement canopies is a flat rate of $9.99. Excludes Hawaii and Alaska.
- Shipping on all other item(s) will need to be calculated when a complete shipping address is entered upon completion of checkout process.
- ALL in stock orders are processed immediately, and cannot be canceled or changed. Although orders are processed immediately, they ship within 1 to 2 business days.
- ALL express shipping orders placed AFTER 1:00pm Pacific Standard Time, Monday - Friday will ship the same business day, excludes holidays or weekends.
- ALL Ground, Standard Overnight, 2 Day, and 3 Day orders are delivered Monday-Friday only, no exceptions, and excludes holidays.
- ALL in stock orders placed on the weekends and/or holidays will not ship until the next available business day.
- Express shipping does not include the day the order is shipped.
- Express shipping is not available for all item(s).
- Ground shipping takes approximately one (1) to seven (7) business days for delivery depending on where we are shipping to.
Returns and Refunds
- No RMA (Return Merchandise Authorization) is needed for returns.
- Returns are accepted within 30 days of receipt.
- All outbound and return shipping fees are non-refundable, and is the responsibility of the customer.
- Packages that are refused or undelivered and returned back to our warehouse are subject to the return shipping fees.
- All returned merchandise must be in new, unused, and in resalable condition.
- Please note that Garden Winds is not responsible for any return items lost or damaged in transit.
- Refunds are issued within three (3) to five (5) business days after the return is received in our warehouse.
- If the item(s) is returned damaged, dirty, or used, we may not issue a full merchandise refund.
- Once the refund is processed you will receive notification via email.
Received Defective or Damaged Item(s)
- Please do not return the item(s).
- Notify us by email within 14 days of receipt of order and email photos of the damaged or defective item(s) to customerservice@gardenwinds.com and reference your order number in the email. We will address your issue via email within 24 to 48 business hours.
For additional information, please view our FAQs and/or Shipping/Returns page links.
-
Installation
Replacement Canopy Installation Instructions
Safety First: WARNING!!! This process requires a person to use a ladder to reach the top of the gazebo. It is important that the ladder that you use be stable and safe. It is important that a second person be present in the event you need help. Safety should be your number one priority to prevent falling during installation. If you do not feel comfortable removing or installing the canopy, please seek a professional for help.
Remove Your Old Canopy First
- Ladder - You will need a stable ladder that will allow you to safely reach the top of the gazebo.
- Loosen Bottom Tier Canopy – Unfasten all Velcro straps. Velcro straps are usually located on the seams of the canopy. Next begin removing the bottom tier canopy. Start with any corner. Pull the canopy fabric away from the corner, and then towards the center of the gazebo roof. Repeat this for all four corners of the bottom tier canopy. With the bottom tier canopy loosened, push the fabric of the bottom tier towards the center of the roof, and let the canopy sit there on the frame for now. Now it’s time to remove the top tier canopy.
- Remove the Top Tier Canopy – Start by removing the roof bars from the corner pockets. Do this by pulling the corner pockets away from the center of the gazebo. Repeat this for all four corners. Unfasten any Velcro straps that are attached to the top tier frame. You should now be able to completely remove the top tier canopy from your gazebo.
- Remove the Bottom Tier Canopy – Remove the bottom tier canopy from the gazebo by looping the center square hole through the top tier frame. The top tier frame has four prongs, each pointing towards one corner of the gazebo. This process will require you to loop the center hole of the bottom canopy through one prong at a time. The first prong is always the most difficult. The process gets easier with each prong of top tier. If the center hole of the canopy is too tight to fit through the prongs, you may need to temporarily loosen the prongs of the top tier from the hub. Once done, you can completely remove the canopy from the gazebo.
Installing New Canopy
- Ladder - You will need a stable ladder that will allow you to safely reach the top of the gazebo.
- Partially Install Bottom Tier Canopy – First, remove the top tier from the bottom tier by unzipping the netting that attaches the top tier and bottom tier together. Then, begin by installing the bottom tier canopy first. Do this by looping the center square hole of the bottom canopy through the top tier frame. The top tier frame has four prongs. Loop the center hole of the bottom canopy through each prong, one prong at a time. Do this for all four prongs. If you loosened the top tier roof bars during removal of the old canopy, here is when you want to tighten the top tier roof bars in place. Doing this will allow you to install the top tier later. Once this is done, let the bottom tier canopy rest on the roof structure. Do not fully install the bottom tier canopy yet, you will still need access to the top of the gazebo to install the top tier.
- Install the Top Tier Canopy – Rest the top tier canopy on the top tier frame. Pull each corner of the top tier towards the end of the prongs. Insert ends of prongs into the corner pockets one prong at a time. You will need to pull a little harder on the last corner pocket to complete the installation.
- Fully Install Bottom Tier Canopy - Begin by pulling the corners of the canopy towards the corners of the gazebo frame. Fasten the bottom tier tightly to the frame by placing the corners of the canopy over the corners of the gazebo frame. Do this for all four corner pockets. You will need to pull harder on the last corner pocket, as there is less slack available. Then fasten available Velcro straps to the roof bars. Finally, connect the bottom tier and top tier together via the zipper lining.
- You’re finished! Enjoy your new canopy!!!
Copyrighted – Garden Winds
Canopy Experts  Send Us a Photo
Avoid the hassle of ordering the wrong canopy!
Send a picture of your entire frame and let us help!

California Proposition 65
 WARNING: This product can expose you to chemicals including benzene and antimony trioxide, which are known to the State of California to cause cancer, birth defects or other reproductive harm. For more information, go to www.P65Warnings.ca.gov.
Supplemental Garden Winds Explanation: Benzene has been used in the manufacturing of this product to meet CPAI-84 fabric fire retardant standards for the tent and canopy industries.